In this video, I show you how to fix a garden hose. This repair is so cheap and easy to do, it makes no sense to go buy another new hose. If you have certain materials on hand it can even be free!
Items in the video:
Repair Kit With Male End:
Repair Kit With Female End:
Male and Female End Kit:
Repair Kit In Line (Middle of Hose):
Pruning Tool for Cutting:
Hose Clamp Assortment:
Copper Pipe Cutter:
ALSO, here is our How To Home Amazon Store, where you can find many of the tools, items, and shirts I use and wear in my videos!
My YouTube Filming and Editing Gear:
Thank you for watching and for subscribing. You can support the channel at no cost to you by using one of the above affiliate links. This helps support the channel for new content!
Blessings,
Adam
How To Home assumes no liability for damage or injury. How To Home highly recommends using proper safety procedures and professionals when needed. Our content is for entertainment purposes only. No information contained in this video shall create any express or implied warranty or guarantee of any particular result. Any injury, damage or loss that may result from improper use of these tools, equipment, or the information contained in this video is the sole responsibility of the user and not How To Home. How To Home will not be held liable for any negligent or accidental damage or injury resulting from equipment, tools, electrical, fire, electronics or any items contained in this video. Attempt projects and repairs at your own risk.
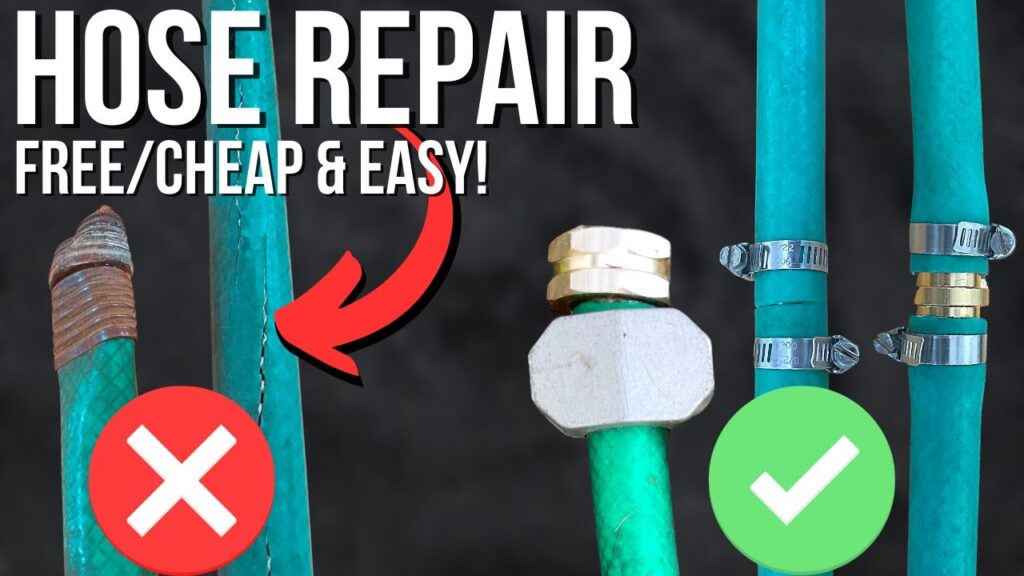
So have you ever come across some of Your garden hoses to where they’re just Spraying water all over the place or Just leaking all over the ground I’m Going to show you how to fix it it only Takes about three to five minutes to Make the repair and it might cost like Two to five bucks in order to do so so Let’s go ahead and Jump Right In let’s Go all right so for this fix this male End here it’s obviously been smashed I Believe I probably ran over it with my Truck and so this happens on occasion Whether it’s a truck or possibly even a Lawn mower sometimes with lawn mowers I’ve actually seen where you think you Have enough clearance with the blades And at the connection hey you don’t have Enough clearance you end up having to Replace this due to it getting all beat Up and damaged so you can pick up this New mail end in many places your local Home Improvement store and of course for All the stuff you’ll see today I’ll have Links down in the description down below As well but these are very inexpensive There’s only two pieces to it so it’s Really easy to do so the first thing I Need to do is I’m going to need to cut This end off and I want to make sure That I’m going to a nice part of the Hose that doesn’t have any damage on it As you can see just down from it a Little ways I’ve got some of that
Cracking going on so I’m going to end up Making my cut just below where this Cracking is to get back to a good Surface of the hose now what I found to Work really well for cutting this are Some handheld gardening shears now if You don’t have gardening shears you can Also use a pair of scissors these don’t Work as well they will definitely take a Little bit longer to get through it and It is a little bit more difficult but I Have used these before and they do work And now you can see we’ve got a nice Clean end here to attach our new male Adapter too now on this particular one It doesn’t have it but if you have a More expensive one or one that claims That it won’t get all kinked up more Than likely when you cut this off what You’re going to find is there’s a little Piece of rubber and a spline that runs All the way down the hose that’s what’s Adding the rigidity to the hose so that It doesn’t Kink up if you do have that You will have to cut that out to Approximately about this far down the Hose which is probably about an inch and A half or so all right so now we’re Ready to install the new male adapter We’ll just cut this little zip tie off And now as you can see we have two Separate pieces here so I’ll quickly Show you how to do this so first thing I Need to do is loosen these two screws on
The clamping portion of this adapter now Of course you can do this with a Phillips head screwdriver and it will Work just fine but if you’ve got an Impact driver or a drill that will speed It up even more All right so now this clamp has plenty Of space to slide to accommodate any Hose that you might have I have yet to Find a hose that would not fit in this Particular clamp so the first thing we Do is Slide the clamp over the hose And then we’ll take the adapter piece And we’re going to push it down inside Of the hose now I don’t have to get the Hose all the way up to the bottom part Of this little collar here this is Definitely sufficient enough and even if I didn’t get it up this high as long as The vast majority of the bottom part of This adapter is down inside the hose There really shouldn’t be any issues Also I don’t think I pointed out we’ve Got a male adapter of course they also Make female adapters so if your problem Is on the female side you can also do This all right so now I’ve got my Adapter down inside of the hose now I’m Going to take the clamp and I’m going to Slide that up over the hose and get it Just up to where the end of the hose is And then once I’ve got it there I’m just Going to tighten it down All right so there you go it really is
That easy to fix the ends of these hoses And it probably took me about two Minutes in order to do so hey really Quickly before I get into the next fix If you’re finding value in this video or You’re finding it to at least be Interesting if you could do me a huge Favor hit that thumbs up button right Down below it really does help the video Out to hopefully like this hose leak out To other people and hopefully be able to Help them out as well I really Appreciate it let’s get back into it all Right so I’m just going to start out by Showing you a couple of ways in order to Fix these cracks that are in the middle Of the hose because this in particular Is incredibly common to happen to where It needs to be fixed or replaced it’s Just over time with all the elements it Just wears down these outer jackets and Then the hose itself to where we’ve got These holes here and the water is just Able to pour out of the hose so the First thing I want to do with this with These two fixes is I want to get back to Some clean and good hose so I need to Cut this section out however long the Crack is I need to cut that whole crack Out to get back to good hose now the Least expensive option in order to Connect these together is if you’ve got Some half inch copper pipe some scrap That you’ve got laying around your shop
Or your garage this is going to be the Cheapest way of then mending these back Together connecting them back together If you don’t have any copper pipe just Laying around and you would like to have Some for maybe future projects that you Foresee you can go pick these up at your Local Home Improvement store these short Little sections and they’re not too Terribly expensive so what I do is I Take my copper pipe I take some pipe Cutters and I just go round and round Gradually making my way through the Copper pipe it does take a decent amount Of revolutions with this particular pipe Cutter but it’s pretty inexpensive and By the time I’m done with it it does Make a nice clean cut Now that I’ve got my pipe cut down to The length that I want now I will take Some hose clamps these are number six Hose clamps and I’ll just put those over Each side of the hose now those hose Clamps are in place now take my pipe and I’ll push them in to each side of the Hose and this slides in pretty easily Now that I’ve got my copper pipe Connecting these two pieces of Hose I’ll Take my hose clamps put them over where The pipe is underneath of the hose and Then tighten them down All right so now this is all tightened Down now the hoses can’t be pulled apart And with all that pressure coming from
The hose clamps pulling that hose down To that copper pipe underneath it’s also Going to provide a watertight seal so This is ready to be put back out into The yard and ready to water things but Another way of fixing this if you don’t Already have that copper pipe laying Around and you want something that’s a Little bit less expensive than going out And buying copper pipe is you can pick These up right here these are inline Adapters you can pick them up just about Anywhere and they’re very inexpensive And of course you can see here it Already comes with but would basically Be the copper it’s got some steps on it Which is going to help to connect to the Hose hold it in place really really well And of course they already come with Their own hose clamps so let me show you Really quickly how to install this so Again I take my hose clamps and I put Them on both sides of the hose then I Take my inline adapter and I push them In to each side of the hose now this Will be a little bit more difficult to Push in to the hoses than the copper Because of those different steps on the Adapter itself I do think that it’s just Slightly wider as well in areas so this Does make it a little bit more Challenging than just the copper piece All right so obviously the more you can Bring these hoses together up towards
This collar here the better but that’s About as far as these hoses are going to Go at least for this size on this piece Here so then like in the last fix I Bring my hose clamps up to close to Where the collar is or where the end of The hose is to then hold that hose down Against that adapter nice and tight and So there you go we’ve got a nice tight Seal here now these two hoses are now Connected together they cannot be pulled Apart and this hose is ready to go also If you like DIY videos like this I’ll Put some links right over here to take You some other videos that you might Find of interest and of course you can Always visit the channel to find other Videos I’ve done in the past so I hope That you found to be helpful if you did Please do me a big favor hit that thumbs Up button right down below and of course If you have any questions or comments at All you can leave those down in the Comment section as well and I’ll catch You all in the next one see ya

great article
great article
great article
Insightful piece
Excellent write-up
great article
Outstanding feature
Excellent write-up
great article